In the fast-paced world of digital content, keeping your WordPress website fresh and up-to-date is crucial. But what if you want to schedule posts to automatically expire and be taken down from your site? Fortunately, WordPress offers a convenient solution for this—post expiration dates. In this guide, we’ll walk you through the steps to set post expiration dates in WordPress and automate the content management process.
Why Set Post Expiration Dates?
Before we dive into the “how,” let’s briefly explore the “why.” There are several compelling reasons to use post expiration dates on your WordPress website:
- Promotions and Events: If you’re running time-sensitive promotions, sales, or event announcements, post expiration dates allow you to automatically remove outdated content.
- Timely News and Updates: Keep your news section or blog relevant by scheduling posts to expire when they are no longer newsworthy.
- Seasonal Content: For businesses with seasonal products or services, setting post expiration dates helps you manage content related to specific seasons or holidays.
- Reducing Manual Effort: Automating post expiration reduces the need for manual intervention, allowing you to focus on creating new content.
How to Set Post Expiration Date in WordPress
Step-by-Step Guide to Setting Post Expiration Dates:
1. Install and Activate the “Post Expirator” Plugin:
To get started, log in to your WordPress dashboard and navigate to the “Plugins” section. Search for the “Post Expirator” plugin. PublicPress Future is one of the best post expiration plugin available in WordPress repository.
Install this plugin. Once installed, activate the plugin.
2. Edit or Create a Post:
Now, either edit an existing post or create a new one. Scroll down to the post editor’s sidebar, where you’ll find a new section labeled “Publicpress Future.”
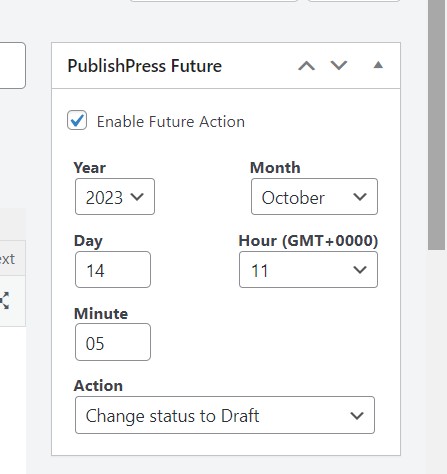
3. Set the Expiration Date and Time:
In the “Post Expirator” section, you can specify the date and time when you want the post to expire. Simply select your preferred date and time from the provided options.
4. Choose Expiration Actions:
Next, you can choose what happens when the post expires. You can opt to move it to the trash, draft status, or a custom status. This depends on whether you want to remove the post completely or keep it as a draft for future reference.
5. Save or Update the Post:
After setting the expiration date and action, click the “Publish” button or “Update” if you’re editing an existing post. Your post will now automatically expire based on the date and action you specified.
Additional Tips:
- Remember to regularly review and update your post expiration settings as your content strategy evolves.
- You can use the “Post Expirator” plugin for both new and existing posts, giving you full control over your content’s lifespan.
- Consider setting a warning message or notice in your posts to inform readers that content will expire, encouraging them to take action before it does.
By implementing post expiration dates in WordPress, you can efficiently manage your content, ensuring that your website remains relevant and user-friendly. Whether you’re running a blog, e-commerce site, or news portal, this feature simplifies content management, allowing you to focus on delivering fresh, engaging material to your audience. So, go ahead and make the most of this valuable tool to streamline your WordPress content strategy and keep your website vibrant and up-to-date.